2 Cardio Mistakes You’re Still Making

Title: 2 Cardio Mistakes You’re Still Making
By line: By Tom Venuto, CSCS, NSCA-CPT
URL: www.burnthefat.com
Word count: 999 words

2 Cardio Mistakes You’re Still Making

By Tom Venuto, NSCA-CPT, CSCS www.BurnTheFat.com

The controversies over cardio for fat loss are  endless: steady state versus intervals, fed versus fasted, long and easy versus  short and intense, and so on. Obviously there is a lot of interest in cardio  training and how to do it right. Sadly, most people are still doing 2 things  terribly wrong and it’s killing their results…… As best as I can figure, there  are two major reasons why people are still mucking up their cardio programs for  fat loss.

REASON #1: NOT ENOUGH FOCUS ON TOTAL CALORIES BURNED

Most people aren’t burning enough darn calories.

Why? Well, I guess they are too busy worrying about the “proper” type of exercise (which machine or activity), the mode (steady state or intervals), the “optimal” ratio of intervals, or the “best” duration.Some people coast along on the treadmill at 2.3 miles per hour or some similar sloth-like pace and they think that just by hitting a TIME goal, such as 45 or 60 minutes, that with “X” duration completed, they are assured to get the results they want. On the other extreme, we have folks who have found or created some mega-intense, super-duper short training protocol like the “4-minute wonder workout from Japan.” Just because the workout is high in intensity and it is performed in intervals, they too think they are assured to get the results they want.

What’s missing in both cases is the realization that total fat loss over time is a function of total calories burned over time (assuming you don’t blow your diet, of course).

AND…

Total calories burned is a product of INTENSITY times DURATION, not intensity OR duration.

Too much focus on one variable at the exclusion of the other can lead to a less than optimal total calorie burn and disappointing results. And remember, intensity and duration are *variables* not absolutes! (“Variable” means you can change them… even if your “guru” says you can’t!)

When you understand the relationship and interplay between INTENSITY X DURATION you will find a “SWEET SPOT” where the product of those variables produces the maximal calorie burn and maximum fat loss, based on your current health condition and your need for time efficiency.

REASON #2: TOO MUCH FOCUS ON WHAT TYPE OF CALORIES BURNED

As best as I can figure, there is one whopper of a mistake that is still KILLING most people’s cardio programs and that is…

Way too much focus on WHAT you are burning during the workout – fats or carbohydrates – also known as “substrate utilization.”

This idea comes from the notorious “fat burning zone” myth which actually tells people to exercise SLOWER and LESS intensely to burn more fat.

Hold on a minute. Pop quiz. Which workout burns more calories?

(A) A 30 minute leisurely stroll through the park

(B) A 30 minute, sweat-pouring, heart-pounding, lung-burning run?

Like, DUH!

And yet we have trainers, authors and infomercial gurus STILL telling us we have to slow down if we want to burn more fat??? Bizarre.

The reason people still buy it is because the “fat burning zone” myth sounds so plausible because of two little science facts:

  • The higher your intensity, the more carbs you burn during the workout
  • The lower your intensity, the more fat you burn during the workout

And that’s the problem. You should be focusing on total calories and total fat burned during the workout and all day long, not just what type or percentage of fuel you are burning during the workout.

It’s not that fat oxidation doesn’t matter, but what if you have a high percentage of fat oxidation but an extremely low number of calories burned?

If you really want to be in the “fat burn zone,” you could sit on your couch all day long and that will keep you there quite nicely because “couch sitting” is a really low intensity (“fat-burning”) activity.

(Of course, “couch sitting” only burns 37 calories per half hour…)

HERE’S THE FAT-BURNING SOLUTION!

In both cases, the solution to burning more fat is drop dead simple: Focus your attention on how you can burn more TOTAL calories during your workout and all day long. If you want to burn more fat, burn more calories and you can do that by manipulating ANY of the variables : intensity, duration and also frequency. If you build your training program around this concept, you will be on the right track almost every time.

BUT WAIT – THERE IS MORE TO IT…

Naturally, we could argue that it’s not quite this simple and that there are hundreds of other reasons why your cardio program might not be working… and I would agree, of course. But on the exercise side, the ideas above should be foremost in your mind.

On the nutrition side, you have to get your act together there too.

For example, many people increase their food intake at the same time as they start a cardio training program thereby putting back in every calorie they burned during the workout! Then some of them have the nerve to say, “SEE, cardio doesn’t work!”

Incidentally, this is the exact reason that a few studies show that adding cardio or aerobic training to a diet “did not improve fat loss”: It’s not because the cardio didn’t work, it was because the researchers didn’t control for diet and the subjects ate more!!

It should go without saying that nutrition is the foundation on which every fat loss program is built.

Choose the combination of type, intensity, duration and frequency that suits your lifestyle and preferences the best, and WORK THE VARIABLES to get the fat loss results you want, but whichever cardio program you choose, remember that a solid fat burning nutrition program, such as Burn The Fat Feed The Muscle is necessary to help you make the most of it.

Train hard and expect success,

Tom Venuto Fat Loss Coach www.BurnTheFat.com

About the Author:

Tom Venuto is a natural bodybuilder, certified personal trainer and freelance fitness Tom Venuto 8

writer. Tom is the author of “Burn the Fat, Feed The

Muscle,” which teaches you how to get lean without

drugs or supplements using secrets of the world’s best

bodybuilders and fitness models. Learn how to get rid of

stubborn fat and increase your metabolism by visiting:

www.burnthefat.com


Killer Abs! Old School Style

Title: Killer Abs! Old School Style

By  Line: Tom Venuto

Website: www.BurnTheFat.com!

Word Count: 3818

I have a confession to make. This might shock you. Are you ready? Don’t hate me. Okay, here it is:

I don’t train my abs very much. Once a week for about 15 – 20 minutes. That’s it. Seriously – no kidding. I work my abs like any other small body part, maybe even less.

Now, you’re probably wondering, how can I possibly get “Killer Abs” with only one ab workout a week?

Well, if you already own my Burn the Fat, Feed the Muscle (BFFM) fat burning system, or even if you’ve simply followed my articles and newsletters closely for a while, you already know the answer…

LESSON #1 – Get rid of the fat or you’ll never see your abs, no matter how often you train, no matter how many reps you do or no matter what exercises you do

LISTEN TO ME: AB TRAINING DOES NOT BURN FAT OFF YOUR STOMACH!

This is probably the biggest misconception that people have about exercise today and I don’t think the general public is EVER going to get it. The myth that ab training burns fat off your abs is so pervasive that I suspect it will never die and simply continue to be passed down from generation to generation.

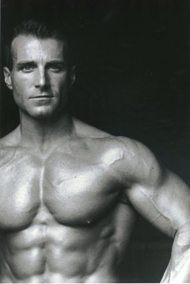
The truth is, getting six-pack “killer” abs has almost nothing to do with training. It has everything to do with low body fat.

Ironically, I believe the abdominal muscles are quite easy to develop; much, much easier than building an 18 inch muscular arm, a 315 pound bench, a 400 pound squat, or a wide, V-shaped back, for example.

Some people might argue that I was just blessed with good genetics in the ab department, which may be true, but based on my experience with others who have less favorable genetics, I still believe that developing the abdominal muscles is easy. The hardest part is getting your body fat low enough for your abs to show.

Most people grossly over train their abs. Training your abs daily or even every other day for hundreds or thousands of reps is totally unnecessary and a complete waste of time. Even  before competitions I only train abs twice a week!

AB EXERCISES DON’T BURN FAT!!!

You lose fat with nutrition and cardio. If you want to see your abs, tighten up your diet and do more cardio! The bottom line is, if your abs are covered with a layer of fat, you won’t be able to see them, no matter how much ab exercise you do! If you need help with a fat loss nutrition plan, check out my BFFM fat burning system

LESSON #2 – The same old basic ab exercises that have been around for years, STILL work – and that means CRUNCHES!

“Core training” and “functional training” are the “IN” things today. Devices and modalities such a stability balls, medicine balls, core balls, ab wheels, kettlebells, functional exercises, and so on, are all valuable tools, but they also represent what is trendy and fashionable in fitness training today.

“Core” and “functional training” come largely from the sports world, and if you’re a competitive athlete, martial artist, golfer, tennis player, or you play any sport recreationally, this type of training is worth looking into.

Very recently, a well-known ab training “guru” wrote in one of his books that “Crunches are worthless.” Funny how things change. It wasn’t so long ago that powerlifter and exercise physiologist Fred “Dr. Squat” Hatfield wrote, and I quote, “Crunches are the Cadillac of abdominal exercises.” (I would have said, “Mercedes of adbominal exercises” but oh well, that’s Fred).

So what’s the deal? Should you crunch or should you ditch this “old” exercise in favor of all the “new stuff?”

The truth is, there’s a happy medium! Crunches are not “worthless,” they’re simply over-used. You can and should incorporate a wide variety of crunch variations into your program, but also be sure to include some “functional” work which will help develop your core musculature and allow you to strengthen and develop your abs through every plane of motion.

However, for pure “cosmetic” ab development, there’s nothing new under the sun. The “old school” methods are as valid as ever. And that starts with crunching exercises. Why? Because a primary function of the abs is to flex the spine and shorten the distance between the sternum and pelvis – which is exactly what crunching exercises do.

Despite all the new and trendy ab workouts and equipment being promoted these days, the good old crunch is the oldie but goodie I always come back to time and time again. I’ve used crunches and their many variations in almost all my training routines for years.

The best Crunch variations (upper abs) 1. Feet on floor reach through crunch 2. Feet on floor, hands crossed over chest crunch 3. Feet on floor hands behind head crunch 4. Feet on bench hands behind head crunch 5. Feet in air hands behind head crunch 6. Feet in air, hands behind head, pull in knees, touch elbows 7. Weight on chest crunch 8. Weight behind head crunch (caution – can strain neck) 9. Weight held at arms length above chest crunch 10. Stability ball crunch, bodyweight 11. Stability ball crunch, with resistance 12. Weighted supine crunch machine 13. Bicycle crunch 14. Twisting elbow to knee crunch

LESSON #3 – Crunch with cables too.

Bodyweight crunches performed off the floor are good. Cable crunches might be even better. Unfortunately, I don’t think I’ve seen more than one out of fifty people perform the exercise properly.

Cable crunches can be performed seated, standing or kneeling. My favorite for bodybuilders and the “six pack abs look” is kneeling cable crunch. Performed properly, this is an AB-solutely KILLER exercise!

KNEELING CABLE CRUNCH

Most people perform the cable crunch like they were bowing. They bend only at the hips brining the elbows straight down to the floor, while the entire spinal column stays in a straight line. This does not cause the abs to contract dynamically through their full range of motion, it only gives you an isometric contraction of the abs, while bringing the hip flexors strongly into play.

Proper form on the kneeling cable crunch is a curling motion, almost like a carpet being rolled up. Another way I like teach this exercise is to have a trainee visualize that a log is in front of them about a foot off the floor, and ask them to imagine they are wrapping their torso around the log, rounding the back over and curling the spine in a circular range of motion, curling the elbows over and around the log and back in towards the knees.

Also, some people perform this facing away from the weight stack, which is one acceptable variation. I prefer facing towards the weight stack and holding a rope with my hands pressed against my forehead or top of my head

Master the proper form on this exercise and you’ll see your abs start coming into focus at an alarming rate.

LESSON #4 – After you’ve developed a substantial level of ab strength, learn how to do this advanced killer ab exercise: Hanging leg raises from the chin up bar

If there’s any “secret weapon” in my ab training arsenal– the one exercise I’ve ALWAYS turned to when I wanted major results is the hanging leg raise, and its “younger brother,” the hanging knee up. These can be performed hanging by your hands from a chin up bar, although it’s much easier with “ab slings” because grip strength is no longer the limiting factor.

I remember many years ago when Bill Phillips once made fun of this exercise in his magazine. He showed a picture of his Brother Shawn swinging precariously from the ab slings in a mocking fashion. I’m not sure why he blasted this movement, and Shawn certainly has a six-pack rack with the best of them. But personally, I think the hanging leg raise and knee up are two of the best ab exercises in existence.

I think the problem is that this exercise is so difficult that most people can’t do them properly. Usually the first time you attempt a hanging leg raise from the chin up bar (with no back support behind you), you swing uncontrollably from front to back. So most people try these once or twice and then give up. Like anything else, practice makes perfect. Hanging leg raises are a very advanced and very difficult movement. Don’t expect to do them like a pro on your first try – and don’t even try them if you’re a beginner.

If you’re a beginner, the best way to develop the strength necessary to do these properly is to start on the support leg raise (also known as the “Captain’s Chair”). That’s the piece of equipment found in almost every gym that has the pad for your forearms and elbows to support your body weight and a back support behind you. Start with support knee ups, then progress into support leg raises with the legs nearly straight. It’s important to use a full range of motion on this exercise and get your knees high up in front of the chest because the lower portion of the range of motion is largely initiated by the hip flexors.

Once you’ve mastered the support leg raise, then you can move on to the hanging knee up and ultimately to the hanging straight leg raise. When you master the hanging leg raise, there’s an even higher level: You can begin to superset from the hanging leg raise (until fatigue) into the hanging knee up. Once you’ve reached the point where you can perform three supersets of 15 to 25 reps of hanging leg raises to hanging knee ups with STRICT form, I guarantee you will have amazing abdominal development (provided of course, that your body fat is low enough).

SIX PACK ABS! LESSON #5 – Yes, you can train your lower abs

One of the biggest controversies in ab training is the question of whether you can “isolate” your upper and lower abs. There are experts who swear you can, and experts who swear you can’t. If someone wants to get technical and split hairs, then it’s true – you CAN’T isolate lower and upper abs. The word “isolation” is somewhat of a misnomer because muscles work in conjunction with other muscles at all times.

For example, a bench press is often called a “compound” exercise because the pecs are heavily assisted by the triceps and deltoids, while a dumbbell flye is usually referred to as an “isolation exercise” because it “isolates” the pecs more. However, the pectorals do not and cannot work in complete isolation from the triceps and deltoids; there is simply a smaller degree of involvement from the assisting muscles in the flye exercise. Therefore, the flye is an “isolation” exercise, relatively speaking, but not literally speaking.

The same is true of the abs. You can’t completely isolate the lower from the upper abs or the abs from the obliques, but you CAN put greater emphasis on the lower or upper abs depending on the exercise you select.

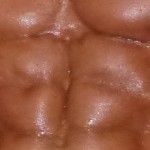
The abdominals are a unique muscle. They are not a single long muscle belly like the biceps, which has continuous fibers running the entire length from origin to insertion. The ab muscles have a tendinous band in between each section. This is what gives the abs their segmented, “six pack” appearance.

Each segment of the abs flexes a portion of the lumbar spine and or pelvis. The lower abs are the part responsible for the flexion of the lower lumbar vertebrae and backward rotation of the pelvis. The upper abs are responsible for the flexion of the upper part of the lumbar spine.

The practical application of this information is simple: Exercises that draw the lower body towards the upper body, such as reverse crunches, hip lifts, and leg raises, emphasize the lower abs. Exercises that draw the upper body towards the lower body, such as crunches, emphasize the upper abs (but neither completely isolates one or the other).

One last tip: Because most lower ab exercises require more coordination and stability (they’re harder), do your lower abs first most of the time (especially if you’re using hanging straight leg raises – doing them last is extremely difficult).

The best lower ab exercises 1. Support knee ups 2. Support leg raise 3. Hanging knee up 4. Hanging leg raise 5. Reverse crunch 6. Incline reverse crunch 7. Stability ball reverse crunch 8. Reverse crunch with medicine ball behind or between knees 9. Hip lift (“toes to sky”) 10. Bent knee leg raise/hip lift combo 11. Incline hip lift

LESSON #6 – Avoid weighted side bends, which thicken the waist. Instead, opt for body weight elbow to knee twisting crunches, twisting hanging knee ups and side crunches to develop your obliques

Which would you rather have: (A) a tiny waist that narrows down from broad shoulders and V-tapered back or (B) A muscular, but thick, wide and blocky waist.

Yeah – I picked “A” too. So do most other people. However, not a day goes by in the gym when I don’t see people doing side bends with heavy dumbbells. I could NEVER understand why people would ever want to do these. I suppose, once again, people mistakenly think they’re burning fat with this exercise.

The way to develop a beautiful and symmetrical physique is to create an illusion: Broad shoulders and a V-shaped torso must flow down into a tiny waist. You want to increase the size of your lats and deltoids (yes that includes you ladies too), while decreasing the size of your waist. Anything that makes your waist bigger will destroy your shape. Weighted side bends can make your waist thicker and wider by developing the muscles on the sides of the waist known as the obliques.

There’s a big difference between sports training and bodybuilding (or “cosmetic”) training. Unless you’re an athlete with a need for a strong, thick trunk musculature, I’d suggest avoiding weighted side bends and all other weighted oblique exercises completely.

Instead, simply do twisting elbow to knee crunches, twisting hanging knee ups, and side crunches only with your body weight. These exercises tend to hit the diagonal fibers of the obliques a little higher up on the waist, not the portion of the obliques on the lower, lateral area of the waist.

LESSON #7 – Sit ups and leg raises are mediocre exercises that can aggravate low  back pain

I’ve found that all varieties of sit-ups aggravate my lower back. Fifteen years ago I sustained a rupture of my fourth lumbar disc (L4) so severe that a neurosurgeon told me that I could forget about bodybuilding, I should never lift more than 40 pounds and I would eventually have to get surgery.

Despite the surgeon’s grim prognosis, I rehabilitated my own back, but to this day, I still have a sensitive lumbar area. Doing the wrong abdominal exercises always brings back the pain almost instantly. I look at this as a positive thing because it has taught me a lot about what’s really happening during certain ab exercises. It has also prompted me to modify my routine to avoid certain troublesome exercises that pull on the lumbar spine more than develop the abs.

Most people think sit-ups are primarily an ab exercise. They’re not. Sit-ups work the abs, but largely in an isometric fashion. Sit ups are an “integrated” exercise that work the abs and hip flexors, but the hip flexors do most of the work (especially the way most people perform them – quickly, with the feet anchored, and with extra weight).

The psoas muscle, which is the primary hip flexor involved in the sit-up, originates on the lower lumbar vertebrae and inserts on the lesser trochanter of the femur (the top of your thighbone). Because the psoas is so heavily involved in the sit up and because the psoas is attached to your lumbar spine, sit ups cause a tremendous amount of “pull” to occur on your lower back.

Visualize an imaginary hand reaching through your stomach, grabbing a hold of your spine, and pulling on it as if the hand were trying to yank your spine right out the front of your stomach. That’s essentially what’s happening when you do sit ups or roman chair sit-ups. Ditto for supine full range straight leg raises.

You might say, “But I feel it working – I feel the burn!” Yes, but your abs aren’t contracting dynamically through their full range of motion, they’re contracting isometrically – and that causes the burn. It’s similar to when you hold a dumbbell out at arms length in front of you for as long as you can. Before long your shoulder is burning like crazy to the point where you cant even hold the dumbbell any longer. You get great burn from this, but that’s not how you’d train your shoulders is it?

Sit-ups have made somewhat of a comeback lately, as the sports training and core training gurus claim that the hip flexors should be integrated into your ab routines. Well, unless you’re an athlete with a specific need for strong hip flexors, you have no history of lower back injury, and you already have a strong lower back and strong abdominals, forget about using sit-ups as your primary exercise. They’re a mediocre exercise at best, and for some people with injuries (even “old” injuries like I have), sit ups are contraindicated completely.

Now… I know what you’re thinking… You know someone who does a zillion sit ups a day, they have great abs and have never had a back injury. Well, first of all, if the individual has strong abs and lower back and no pre-existing injuries, sit ups done with good form won’t necessarily cause an injury. Second, as I said earlier, developing the abdominal muscles is not difficult. To a certain degree, you can develop the ab muscles from almost any ab exercise – even nothing but sit-ups or isometric contractions from indirect ab work.

When I was back in my “human guinea pig” days, I once went over a year without doing any ab exercises whatsoever. After I dieted down to about the mid single digits in body fat, there were my abs, looking almost as good (easily 80%) as they did the year before when I was training them twice a week. Knowing this, I’m often tempted not to train abs at all, except that I know strong abs are important for stability and injury prevention, not to mention that I want my abs looking 100% their best, not 80% or 90%.

Just because someone has great abs doesn’t mean they’re using the best routine. Part of it may be genetics, but mostly it just means they have low body fat! Let me drive this point home AGAIN – Having “killer six-pack abs” has less to do with training than with low body fat. Everyone – including you – has a six pack! Most people just can’t see theirs yet.

LESSON #8 – When you reach the advanced level, begin using supersets, tri-sets and giant sets (circuit training) in your ab workouts.

One of the fastest ways I know of to develop the abs is to use supersets, tri sets, giant sets or circuit-style ab training, where you perform two or more exercises in a row without stopping. Coincidentally, this is also a great way to get your workouts finished faster. This is advanced form of training and you’ll need time to build up the strength and endurance necessary to use these techniques.

A SUPERSET is where you perform two exercises in a row without stopping. For example, you might do a reverse crunch for 15-25 reps, then without any rest whatsoever, go directly into a regular crunch for 15-25 reps, for a grand total of 30 – 50 reps non stop. That’s one superset. You would then take your usual rest interval and repeat for the desired number of sets.

TRI-SETS are the same as supersets, except you perform three exercises in a row without stopping. For example, you might do the reverse crunch, hip lift, and regular crunch all in a row with no rest between exercises. (ouch!)

GIANT SETS are when you perform four or more exercises in a row without stopping. Some people call this circuit training, although performing “circuit training” for a single body part is generally referred to more often as “giant setting.”

PART II: My Favorite “old-school” killer ab Routines

The best way to finish up an ab article is with some routines, don’t you agree? All of the following routines are actual programs that I have used and/or are currently using now. I have tested them and they’re all KILLER!

Basic straights sets routine 1. Reverse crunch 3 sets X 15-25 reps 2. Floor crunch 3 sets X 15-25 reps 3. Elbow to knee twisting crunch (or side crunch) 3 sets X 15-25 reps

Advanced straight sets routine 1. Incline reverse crunch 3 sets X 15-25 reps 2. Kneeling cable crunch 3 sets X 15-25 reps 3. Hanging twisting knee up 3 sets X 15-25 reps

Heavy-light routine Select three ab exercises, all using resistance, for example: 1. Kneeling cable crunch 2. Weighted stability ball crunch 3. Supine Ab crunch machine

Perform three sets of each exercise. Every other workout, change repetition range as follows:

Workout A: (light) 15-25 reps, tempo 1011 Workout B (heavy) 8-12 reps, tempo 2022

Tempo (seconds) 2 eccentric 0 pause in stretch pos 2 concentric 2 pause in contracted position

Superset routine 1. Hanging knee up 2-3 sets X 15-25 reps superset to: 2. Kneeling cable crunch 2-3 sets X 15-25 reps

3. Reverse Crunch 2-3 sets X 15-25 reps superset to: 4. Crunch with feet on bench 2-3 sets X 15-25 reps


Tri-set routine 1. Hanging Leg raise 3 sets X 15-25 reps no rest, go directly to: 2. Hanging Knee Up 3 sets X 15-25 reps no rest, go directly to: 3. Weighted supine crunch 3 sets X 15-25 reps rest 60 seconds, repeat for a total of three tri-sets

The Ultimate Killer Ab Routine (giant set) 1. Hanging straight leg raise 15-25 reps 2. Hanging knee ups 15-25 reps or as many as possible 3. Hip lift 15-25 reps 4. Reverse crunches 15-25 reps 5. Weighted supine crunch 15-25 reps 6. Bodyweight crunches 15-25 reps

Each sequence of six exercises is one giant set. Rest 60 – 90 seconds after you finish exercise #6, then repeat for a total of three circuits. (if you can get through three circuits of this routine with strict form, including hitting 25 strict leg raises and 25 knee strict knee ups, you are in elite company) Good luck!

Conclusion These eight principles and the sample routines are just the tip of the iceberg in my ab training arsenal but it’s all I have time for in this article. However, this should be more than enough ammo for you to begin an all out assault on your abs.

If you employ these techniques in conjunction with a supportive fat loss nutrition and cardio program such as Burn the Fat, Feed the Muscle (BFFM), your abs will come in so fast it will almost scare you!

Train hard and expect success,

Tom Venuto, Fat Loss Coach Author of Burn the Fat, Feed the Muscle www.BurnTheFat.com Founder and CEO of the Burn the Fat Inner Circle www.BurnTheFat.com/InnerCircle

Odontoiatria: Come ho risolto la terza classe scheletrica o morso inverso con linea mediana across….la mia esperienza

Titolo: Odontoiatria: Come ho risolto la terza classe scheletrica o morso inverso con linea mediana across….la mia esperienza

Autore: Piero Maina

Conteggio Parole: 4163

Cari lettori, avevo scritto più di un anno fa un articolo sulla mia esperienza (qui) con il libro che promuovo su questo sito: “Burn The Fat Feed The Muscle” e i benefici che ne avevo/ho ricavato a livello di forma fisica e buona salute. Apro una parentesi ( Diciamo che l’argomento non trova una precisa collocazione all’interno di questo blog perché parla di denti, ma la sua correlazione è tutt’altro che trascurabile come collegamento trasversale alle categorie a cui lo ho assegnato e l’ho quindi inserito all’interno del menù “tenersi in forma”).  In quel contesto avevo raccontato tutte le mie problematiche a livello di salute e incidenti vari che avevano accompagnato la mia esistenza e avevo scritto che a breve avrei raccontato come avevo risolto il problema dei denti che sia come fatto estetico, ma ancora di più funzionale, aveva condizionato la mia vita fino all’anno 2010, anno in cui ho risolto con la sola cura ortodontica un caso che era sempre stato definito risolvibile solo chirurgicamente e considerato grave ed inoltre è stato risolto in una età compresa fra i 46 anni e sei mesi e 48 anni e 4 mesi. Quindi in età più che adulta. Premetto che non sono un dottore, ma di “dottori” ne ho incontrati molti e a molti ho chiesto pareri professionali. La tristezza nasce quando siamo pazienti “ignoranti” e ci rivolgiamo appunto ad un professionista, con la speranza che il suo “sapere” risolva la nostra situazione nel migliore dei modi. Come in ogni ambito professionale, ci sono professionisti e professionisti, ma noi siamo sempre gli “ignoranti” e quando per correttezza vogliamo ascoltare più di un parere, diventa difficile quando il parere di A e quello di B sono diametralmente opposti. Se poi come spesso accade volessimo ascoltare anche il parere di C e disgraziatamente anche questo parere risultasse essere completamente discordante con quello  dei due professionisti precedentemente interpellati, allora diventa veramente difficile fare una scelta corretta. Questo avviene anche nella mia professione con i bastoni da golf, ma qui stiamo parlando di salute e non di oggetti inerti e aggiungo anche, quando le consulenze non sono fatte in buona fede.

Per raccontare la mia storia/esperienza, bisogna partire dai tempi della gioventù, quando le prime carie e le prime trapanazioni, magari effettuate da dottori non proprio professionalmente ineccepibili, mi fecero compagnia. Stiamo parlando dei primi anni 70, quando le stesse tecniche non erano sicuramente paragonabili a quelle odierne. Resta il fatto che rimasi traumatizzato durante un’estrazione. Avevo quasi tredici anni, era il 1973 ed ebbi la sfortuna di avere un molare (il 16 per chi è del mestiere), cariato e non curabile con le radici convergenti fino a toccarsi. Il dentista in questione impiegò quasi un’ora ad effettuare l’estrazione e il dolore che provai, nonostante l’anestesia, non posso raccontarlo, oltre alla febbre molto alta che mi accompagnò nei giorni seguenti, etc. Risultato: non volli vedere mai più un dentista.

Piero 1992
Settembre 1992
Clicca sull’immagine per ingrandire
Clav
Marzo 1984
Clicca sull’immagine per ingrandire

Naturalmente, non curando i miei denti, mangiando molti dolciumi e altro, le carie ai vari molari, non tardarono a venire  e quando il dolore divenne insopportabile, ricorsi mio malgrado alle cure di altri dentisti che nuovamente non all’altezza curarono i miei denti in maniera non proprio impeccabile. Della terza classe scheletrica o morso inverso, non me ne ero mai accorto né nessuno me lo aveva mai fatto notare e a detta di molti ero anche un “bel ragazzo” e spesso veniva lodato il mio sorriso. Poi un giorno nel 1989 una signora (dentista), parlando con me del più e del meno mi dice :”…tu hai il morso inverso…” da quel momento la mia attenzione cadeva sempre sulla mia bocca o su quella degli altri per notare la differenza e nacque in me un vero e proprio complesso. Arriviamo al 1993; non farò né nomi di persona né di luoghi a questo punto, ma incontrai un dentista nella sede lavorativa dove mi ero trasferito in quell’anno e questo dentista mi restituì la fiducia verso la categoria e curò la mia bocca facendola diventare una bella bocca. Rimasi in quella città fino al 1995 e naturalmente gli chiesi se la mia situazione di “morso inverso” si potesse risolvere. Fatte le dovute analisi e con le competenze che lui e i suoi colleghi avevano a quei tempi, mi disse che non si poteva fare nulla, sconsigliava la chirurgia e avrebbero voluto togliermi altri denti per diminuire l’affollamento nei denti inferiori e con la cura ortodontica “ridistribuire” i restanti, ma la discrepanza mandibolare era troppa e quindi mi disse di lasciare perdere. In fondo la mia mandibola non si bloccava e anche per lui avevo un bellissimo sorriso e quindi mi disse che era meglio non procedere.

Accettai la cosa, ma in cuor mio non smisi mai di sperare per una soluzione del mio caso ed arriviamo al 2007. Prima di proseguire, voglio spiegarvi che nonostante fossi rientrato a Roma, pur di non cambiare dentista, ogni 6 mesi facevo più di 1.200 km fra andata e ritorno per andare dal vecchio dentista per cercare di mantenere una bocca sana e in parte ne approfittavo per andare a trovare i miei genitori che erano di strada. Un’altra cosa va detta, nonostante la mia bocca sembrasse essere sana, ogni qualvolta affrontavo la profilassi di igiene dentale, le mie gengive sanguinavano e il dolore era forte, ma anche in questo caso non mi venne detto niente e si diceva che per colpa della situazione di “affollamento” e dei denti storti era una condizione paradontale con cui convivere e di cercare di mantenere la situazione della riduzione delle gengive sotto controllo il più possibile. Torniamo a noi: a marzo 2007 prendo un volo per Atlanta (USA) e su un Boeing con più di 360 passeggeri a bordo, mi ritrovo seduto nel posto a fianco un caro e vecchio amico di gioventù che non rivedevo dal 1985. Destino? Sincronicità? Non lo so, resta il fatto che non ci eravamo dati appuntamento e io partivo da Roma per un convegno sui bastoni da golf negli USA e lui era diretto in Texas, proveniente da Genova per un convegno sull’implantologia dentale.

Quando ci siamo rivisti, passato il primo momento di stupore e gli abbracci di due vecchi amici che non si vedevano da ventidue anni, abbiamo naturalmente cominciato a parlare, ricordandomi di lui come un windsurfista con cui facevo le regate insieme. Non potevo immaginare che nel frattempo era diventato uno dei più affermati implantologi Italiani. Gli chiesi allora cosa ne pensava della mia situazione dentale e lui senza entrare troppo nel tecnico mi disse che a quel momento c’erano nuove tecniche ortodontiche e che le cose potevano essere risolte, ma non mi disse nulla di specifico a riguardo. Così, arrivati ad Atlanta ci congedammo e ci scambiammo i numeri di telefono, ma non prendemmo nessun appuntamento o altro. Per come sono fatto io, se decido che una cosa m’interessa, vado subito fino in fondo e voglio capirne di più, ma ammetto che non essendo entrato troppo nel merito della mia situazione e ricordando il mio amico come un windsurfista, non colsi l’occasione di andare a trovarlo (anche lui di Genova e quindi abitava vicino a dove abitavano i miei genitori) e lasciai passare un altro anno.

Aprile 2008: tornai dal mio dentista a 600 km di distanza a Savona che non vedevo da un anno e durante la solita profilassi di igiene e controllo dentale, gli chiesi cosa ne pensasse della mia situazione di “morso inverso”  dopo 13 anni dalla prima diagnosi, e lui mi rispose che ora aveva le competenze per risolvere il mio caso e che ne aveva già risolti altri quattro. Mi spiegò che avrebbe lavorato in equipe con una ortodontista di Genova e un medico chirurgo specializzato nel maxillo facciale molto bravo e che il mio caso era di facile soluzione. Avrei dovuto portare un apparecchio ortodontico per circa due anni per raddrizzare nuovamente i denti e una volta in asse procedere con l’operazione di riduzione mandibolare per ristabilire il “morso” corretto e risolvere il problema di malocclusione dentale. Sempre a suo dire non avrei sofferto troppo e per il chirurgo era una delle operazioni più semplici da eseguire e io naturalmente avevo massima fiducia in lui. A quel punto gli chiesi se conoscesse il mio amico implantologo, ma mi rispose di no e gli chiesi se conoscesse la tecnica Damon, ma anche in quel caso la risposta fu negativa, mi disse che per me c’era la sola via chirurgica per risolvere e se volevo, potevo incontrare l’ortodontista che collaborava con lui a Genova per sentire cosa ne pensasse della mia situazione. Visto che era di strada andai immediatamente a fare un primo controllo sommario, una visita a vista e anche la dottoressa ortodontista, mi disse che ero un caso chirurgico grave. Chiesi a lei se conoscesse il mio amico implantologo e mi disse di si, chiesi se conoscesse la tecnica Damon e mi rispose affermativamente, ma mi disse anche che per me il “Damon” non serviva a nulla e potevo risolvere la mia situazione di “terza classe” chirurgicamente e definitivamente, previa l’applicazione di un apparecchio ortodontico per circa due anni.

Ammetto che volevo risolvere la questione e la mia fiducia era massima ed ero quindi disposto oltre ai costi, a sopportare l’inserimento di un apparecchio ortodontico nella mia bocca, a viaggiare da Roma fino in Liguria mensilmente per il controllo dello stesso e a subire un’operazione alla mandibola in seguito che a differenza di come veniva venduta dal mio dentista, non era poi una vera e propria “passeggiata di salute”.

Voglio anche dire che la mia situazione di malocclusione dentale, contribuiva a farmi deglutire in maniera errata, il fatto era dovuto alla mia lingua che invece di appoggiare correttamente contro il palato durante le normali attività quotidiane, o sotto sforzo o ancora durante la deglutizione, appoggiava contro l’arcata dei denti inferiori, contribuendo ulteriormente a spingerli verso l’esterno.

Rientrato a Roma provai a sentire un parere di un noto ortodontista della Capitale, il quale fece tutte le misurazioni del caso e non si sbilanciò, disse che in effetti era una “terza classe scheletrica across/ cross byte” (oltre ad avere il morso inverso, avevo la linea mediana disassata di un dente verso sinistra, questo per il fatto che l’estrazione del molare “16” quando avevo tredici anni, creò uno spazio in bocca e i denti che sono mobili, sono migrati verso destra andando a chiudere quello spazio, creando una nuova problematica). L’Ortodontista romano, disse che probabilmente avrebbe dovuto risolvere la cosa chirurgicamente, ma si prese tempo per decidere. Nel frattempo mi disse che prima di risolvere il problema della terza classe across, c’era da sistemare la mia bocca, sia a livello paradontale che di altre “situazioni non a norma” presenti nella mia bocca e mi chiese se il mio attuale dentista non me ne avesse mai parlato. Io risposi che sanguinavo e sentivo male quando effettuavo la pulizia dei denti, ma nient’altro. Il professionista romano, mi chiese se poteva comunicare con il “collega” Ligure e io naturalmente risposi di si.

Al telefono i due discussero animatamente e naturalmente il mio dentista si sentì offeso perché interpellato da un altro medico. Io dissi che pur comprendendo l’accaduto, mi sentivo in dovere di andare a parlare con il mio dentista a Savona, anche perché mi curava da 15 anni e io avevo fiducia in lui. Quando andai dal mio dentista, e parliamo di maggio 2008, mi ricevette dicendomi che quello di Roma non doveva permettersi di chiamarlo e che se volevo risolvere la mia situazione, non c’erano alternative o altro. Era inutile girarci intorno e trovare mezze misure, dovevo agire nel migliore dei modi e in maniera definitiva. Mi convinse, ero pronto ad iniziare l’avventura di portare l’apparecchio e poi dopo due anni affrontare l’operazione e ritrovare un bel sorriso e una postura più corretta. Ultimamente infatti, quando effettuavo certi tipi di lavoro in piedi  per lungo tempo, le fitte alla base del collo erano diventate sempre più insopportabili, quasi come un cane che lo mordesse e questa patologia era sicuramente dovuta alla mia mala occlusione dentale.

Esco dallo studio del mio dentista a Savona, e qui il destino/sincronicità ritornano in gioco: stavo tornando verso l’autostrada per rientrare e alcuni giorni prima, un maestro di golf di Roma mi aveva detto che suo fratello stava lavorando in un nuovo circolo di golf ad Albisola (SV) e sapendo che dovevo andare da quelle parti, magari potevo andare a salutarlo. Premetto che ero amico del maestro di golf, ma il fratello l’avevo visto solo un paio di volte e quindi, sinceramente, non è che avessi urgenza di passare a salutarlo. Stavo quindi pensando di prendere l’autostrada per rientrare, anche perché non sapevo bene dove si trovasse il circolo in questione, ma di nuovo le circostanze di traffico mi fecero andare a prendere l’autostrada ad Albisola invece che a Savona e arrivando nei pressi del casello, vidi uno di quei cartelli segnaletici turistici marroni con su scritto “La Filanda Golf Club”. “Toh!” Mi dissi, “…è qui vicino, ci faccio un salto”. Il fratello del mio amico maestro, maestro anche lui, all’inizio non si ricordava nemmeno di me, ma portandogli i saluti del fratello e poi ricordandogli il mio nome ritrovò la memoria e mi disse:”…sta venendo da alcuni giorni una mia allieva da Genova a giocare e mi ha parlato di te, perché un suo amico che non gioca a golf le ha raccontato della tua bravura come clubmaker/clubfitter….. non ricordo come si chiama, ma aspetta che la chiamo e mi faccio dire….”. Naturalmente sembra impossibile, ma l’amico in questione era il mio amico implantologo! A questo punto, visto il modo nuovamente casuale e insolito in cui il mio amico Alberto era tornato “in gioco”, decisi di chiamarlo per raccontargli le novità . Al telefono gli raccontai pima dove mi trovavo e poi come per la seconda volta era tornato presente nella mia vita ed aggiunsi che ero a Savona perché avevo deciso di risolvere chirurgicamente la mia questione dentale…”FERMO!!!! FERMO!!!!” Urlò al telefono. Mi chiese se rimanevo ancora in zona e risposi che sarei ripartito nel pomeriggio seguente e allora m’invitò a passare nel suo studio di Genova la mattina seguente che voleva darmi un’occhiata.

Anche la sua visita sommaria, lo fece propendere come una terza classe risolvibile chirurgicamente, ma guardandomi attentamente, secondo lui c’erano le condizioni per un recupero e che c’era una dottoressa a Milano che forse avrebbe potuto risolvere la mia situazione non chirurgicamente e con risultati analoghi e questo mi venne detto da “fratello a fratello”. Voglio inoltre aggiungere che tutta la famiglia del mio amico lavora in ambito dentistico, essendo figli d’arte e uno dei tre fratelli è anche un bravissimo ortodontista che probabilmente avrebbe potuto lavorare al mio caso, ma la professionalità del mio amico Alberto fu massima e mi invitò ad andare a Milano con lui previa effettuazione del Telecranio e ortopanoramica. Presi appuntamento per il 10 giugno 2008.

2008_06_10_priv
10 Giugno 2008
Clicca sull’immagine per ingrandire

La dottoressa/ortodontista Milanese, quando mi vide, disse purtroppo anche lei che ero un caso chirurgico grave e nonostante a me non sembrasse di essere in una condizione così grave, la cosa veniva ripetuta da tutti e visti anche molti casi con situazioni anche diverse dalla mia risolti dalla dottoressa, nella mia percezione il mio caso sembrava davvero più facile. Comunque la dottoressa pur manifestando perplessità, disse che avrebbe voluto provarci d’accordo con il mio amico Alberto e io dissi che ero pronto e fiducioso a cominciare l’avventura. Mi venne detto che sarebbe stato utilizzato un apparecchio Damon e degli elastici e la percentuale di successo era proporzionale anche al mio impegno e al mantenimento in bocca degli elastici 24/24. Naturalmente tolti i tempi per mangiare cibi solidi. Risposi che se alla mia età non avessi dato il massimo allora non sarei stato nemmeno la persona che sapevo di essere. Il 12 Giugno 2008 a Milano avevo il mio apparecchio Damon con gli elastici in bocca ed ero pronto anche ad affrontare l’avventura con tutti gli annessi e connessi.

2008_06_12_priv
12 Giugno 2008
Clicca sull’immagine per ingrandire

Che dire, l’avventura era iniziata e anche il “sacrificio” sia estetico che funzionale. Infatti l’apparecchio faceva il suo lavoro e le forze che agivano sui miei denti non erano proprio inesistenti. Era come sentire delle “morse” che spingevano sulle radici, oltre agli elastici che nel loro piccolo contribuivano a “spingere” e che toglievo quando dovevo mangiare, ma appena terminato, via a lavarmi i denti con spazzolino ortodontico e scovolino (curaprox cp15 per l’esattezza) e subito dopo li rimettevo al loro posto. Naturalmente la situazione del fastidio/dolore si stabilizzava dopo una settimana/dieci giorni, l’unico problema è che io abitavo a Roma e la dottoressa a Milano e pertanto in caso di urgenza non era proprio il massimo. Infatti è capitato che il “filo” di acciaio del Damon ogni tanto sporgesse in fondo e mi bucasse la guancia o gli attacchi mi ulcerassero l’ interno delle labbra. Risolvevo la cosa mettendo della cera sugli attacchi e addirittura delle volte ho agito con le pinze da elettricista per tagliare la sporgenza del cavetto. Non vi spaventate, sono cose che capitavano sporadicamente, ma sono capitate. Come una volta mentre ero all’estero si ruppe l’archetto superiore e dovetti trovare un ortodontista che lavorava con il Damon, ma lo trovai e risolsi anche questo incidente. Qualche fastidio l’ho provato, ma niente di trascendentale o altro che non potesse essere risolto . Voglio ricordare che comunque anche in caso di operazione avrei dovuto portare l’apparecchio ortodontico per circa due anni ugualmente e solo al termine avrei subito l’operazione alla mandibola che ricordo non essere proprio il massimo da affrontare e sempre senza la certezza di riuscita, oltre alle sofferenze che intercorrono.

Mi viene attribuito parte del successo per la mia collaborazione ad indossare gli elastici 24/24, oltre che ad aver effettuato la pulizia dei denti ad ogni pasto. Come ho già scritto sopra, sarebbe stato veramente inutile se una volta apprese le regole comportamentali io avessi agito a modo mio. Ho eseguito solamente quanto mi è stato detto e il risultato è sotto gli occhi di tutti. Gli elastici e le molle che vengono inseriti in bocca sull’apparecchio opportunamente posizionati e calibrati, applicano delle forze costanti e in specifiche direzioni, che daranno i risultati che anche io ho ottenuto, ma a patto che queste forze non vengano mai interrotte. Qui sta parte della difficoltà nell’eseguire il lavoro con competenza e professionalità per avere buone probabilità di successo. Se le forze non vengono applicate nella direzione giusta  e con la giusta intensità, si otterranno nuovi problemi e per usare un paragone sul Damon, è come dare una Ferrari a un diciottenne neopatentato….molto probabilmente si schianterà contro un albero!

Già da Settembre 2008 dopo soli tre mesi si erano visti enormi cambiamenti.

2008_09_04_priv
4 Settembre 2008
Clicca sull’immagine per ingrandire

Oltretutto sono al corrente che i nuovi apparecchi Damon sono anche meno visibili e
tecnologicamente più avanzati di quelli che ho messo io. Nelle foto qui sopra vedete degli spessori blu sugli ottavi, (sono gli ultimi denti) dei “tacchi”. Sono spessori che vengono messi, per far si che l’apparecchio e gli elastici possano lavorare.  Che vuol dire che la mandibola rimane dov’è ora e sarà l’arcata superiore che comincerà a migrare verso l’avanti, senza essere inibita dall’arcata inferiore e fino a diventare “testa a testa”, per me nel mese di Novembre 2008.

2008_11_04(1)PRIV
4 Novembre 2008
Clicca sull’immagine per ingrandire

Ho “scavallato” con l’arcata superiore nella prima settimana di Gennaio 2009

2009_01_27_priv
27 Gennaio 2009
Clicca sull’immagine per ingrandire

e poi è stato un divenire di miglioramenti ogni mese che passava e a differenza di quanto altri ortodontisti avrebbero fatto, mi è stato ripristinato lo spazio nel settore 1 (superiore destro), per permettere di fare l’impianto del 16 (sesto) molare che era il dente estratto all’età di tredici anni ed era stato il responsabile della mia situazione “crossbite /Morso crociato“. Qui potete vedere il dettaglio dalle foto, dove è stata inserita una molla che “spinge” i denti fino a ricreare lo spazio originale. Qui siamo a settembre 2009.

2009_09_10(2)
Settembre 2009 – Dettaglio molla arcata superiore
Clicca sull’immagine per ingrandire
2009_09_10(4)
Settembre 2009 – Dettaglio molla arcata superiore
Clicca sull’immagine per ingrandire

Arriviamo finalmente ad Aprile 2010 quando ho levato il Damon dalla mia bocca.

2010_04_06_11 fine-Gallery 2 priv
6 Aprile 2010
Clicca sull’immagine per ingrandire

Naturalmente porto un “filetto” fisso all’interno dei denti inferiori che non si vede e che mantiene stabile l’arcata inferiore evitando recidive (splint è il nome in gergo) e la notte indosso un apparecchio mobile di contenzione per mantenere a sua volta stabile e consolidare la situazione dell’arcata superiore. Inoltre nei due anni successivi ho sistemato altre imperfezioni nella mia bocca che andavano fatte, compreso un primo innesto di gengiva nella parte inferiore sinistra con ottimi risultati.

Comparaison-Gallery 28m priv
Comparazione Giugno 2008 – Aprile 2010
Clicca sull’immagine per ingrandire
Comparaison-Gallery 28m a_priv
Comparazione Giugno 2008 – Maggio 2011 dopo innesto gengiva 3° settore inferiore
Clicca sull’immagine per ingrandire
Comparaison-Gallery 26-1m_priv
Comparazione Telecranio 06/2008 – 04/2010
Clicca sull’immagine per ingrandire
20120522_1PRIV
Maggio 2012
Dopo esecuzione igiene orale
Clicca sull’immagine per ingrandire
20120522_5PRIV
Maggio 2012
Dopo esecuzione igiene orale
Clicca sull’immagine per ingrandire
20120522_4PRIV
Maggio 2012
Dopo esecuzione igiene orale
Clicca sull’immagine per ingrandire
20120522_3PRIV
Maggio 2012
Dopo esecuzione igiene orale
Clicca sull’immagine per ingrandire
20120522_2PRIV
Maggio 2012
Dopo esecuzione igiene orale
Clicca sull’immagine per ingrandire
Pie Oristano 2012
Agosto 2012
Clicca sull’immagine per ingrandire

Nota: Il sangue che vedete sulle gengive nelle foto qui sopra è dovuto al fatto che pochi minuti prima dello scatto mi era stata fatta la profilassi di igiene orale con gli ultrasuoni e pertanto le gengive erano in stato di stress. Ovviamente dopo poco tempo tutto torna alla normalità. Inoltre si nota che la linea mediana non è perfettamente allineata, ma oltre ad essere veramente una differenza minima, il fatto è anche amplificato dalle leve posizionate all’interno delle labbra per “allargare” la vista sui denti e vi posso assicurare che ad oggi questa differenza si è ulteriormente ridotta e mi vedo perfettamente allineato.

Il movimento dell’arcata superiore verso l’avanti è avvenuto utilizzando solamente la tecnica ortodontica e senza l’utilizzo di alcuna chirurgia. Il metodo utilizzato permette, come è stato pubblicato sulla rivista scientifica Quintessence International (edizione italiana), di ottenere spostamenti ossei ortopedici uguali in misura lineare a quelli ottenuti con la tecnica chirurgica e misurabili sulle radiografie durante e dopo la cura. Ma la tristezza è che in ambiente medico ci sono medici chirurghi che hanno il coraggio di dire che non è vero che abbiamo risolto come ho raccontato e con la sola cura ortodontica, ci sono personaggi che pur di ingrossare il loro portafoglio, non avrebbero alcun timore a mettere mano ai ferri e operare; hanno persino accusato la mia dottoressa che sia il telecranio che le foto finali sono truccate!!!

Ancora una volta il pensiero positivo ha permesso che le cose si risolvessero nel migliore dei modi. Il risultato lo avete visto nelle foto che ho pubblicato. E’ stato raggiunto un ottimo compromesso di compensazione che forse non sarebbe stato raggiunto nemmeno con la via chirurgica, senza contare le sofferenze a cui sarei andato incontro. L’aspetto estetico è quello di una bocca sana ora e anche a livello paradontale la situazione è tutta un’altra cosa. Lo vedo anche durante le sessioni di profilassi e igiene dentale e dal colore delle mie gengive. Funzionalmente anche la mia schiena ne ha beneficiato e ora, pur avendo le vene succlavia ed ascellare sinistre interessate dalla trombosi danneggiate per sempre, sono tornato ad allenarmi regolarmente ed eseguo anche trazioni alla sbarra e spinte verso l’alto con i manubri per le spalle. Ricordo per chi non avesse letto l’articolo a cui ho messo il link all’inizio di questa pagina, che non avevo più potuto allenarmi con i pesi per diciotto anni e la causa della trombosi era stata la conformazione scheletrica nella zona sterno clavicolare data anche dalla situazione dei miei denti e mala occlusione. Diciamo che è stato come essere trattenuto da delle bretelle e finalmente questo vincolo è stato rimosso e ho riacquistato la mia funzionalità e la voglia di sorridere in tutti i sensi.

Concludo dicendo che questa è la mia esperienza e quanto ho raccontato corrisponde al vero e chi mi conosce di persona lo sa. Naturalmente ogni caso va visto a se ed inoltre un ruolo fondamentale lo svolge il paziente per il grado di impegno, applicazione e collaborazione. Va detto che ho inviato alla Dr.ssa un amico Milanese di 41 anni che aveva una situazione analoga alla mia e anche lui ha risolto felicemente la sua situazione effettuando lo stesso tipo di “cura” e ora è un’altra persona. Spero che alcuni di voi leggendo queste mie righe trovino lo spunto per intervenire e possano risolvere una problematica che so quanto incide  sulla qualità della vostra vita. In bocca al lupo!

© Copyright Piero Maina – Tutti i diritti riservati